2 months ago
Tuesday, May 31, 2011
a vintage day!
Today I start my apprenticeship at Polly Sue's vintage store in Takoma Park, MD. If you're local, come visit me on a Tuesday or Saturday morning! I will be learning the vintage business, in the hopes of starting my own shop in a year or so.
Friday, May 13, 2011
flowers and things
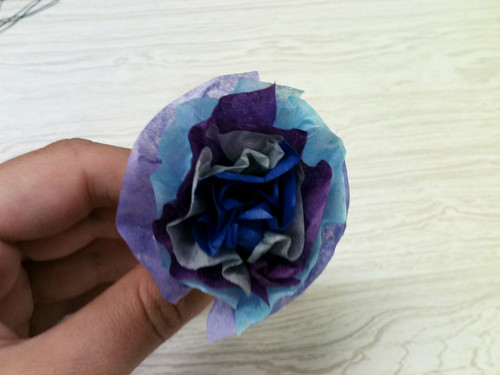
Looks like I was wrong about not having time to post, because here I am with a tutorial! I made mini tissue paper flowers with my kids at work, and made some of them into a floral crown. It turned out so cute I had to share the instructions with you, Internet.
So: here's what you need.
-at least 5 colors of tissue paper
-floral wire
-scissors
First, cut your tissue paper into small rectangles. Mine were about 2.5" by 3.5", but they don't have to be exact. Yours can be a little bigger or smaller, depending on how big you want your flowers to be. (These instructions also work for making GIANT flowers, which the kids enjoyed just as much. They don't make very good crowns, though.) Pick out 5 sheets, and cut a piece of floral wire about 4 inches long.

Next, stack your tissue paper sheets and accordion-fold them together the whole way across.

Fold the end of your floral wire (at least half an inch) over the middle of your tissue paper, and twist it tightly in place.

The next part can be a little tricky. Start pulling the individual 'petals' of your flower apart. Work from the center outwards.

Once you've separated all the petals, you should have a lovely, fluffy tissue-paper flower!

If you want to make your flowers into a crown, you'll need to make a bunch-- I used 7 for mine. Take a looooong piece of floral wire, and make a loop big enough to fit securely around your head. I wrapped mine around three times, so it would be extra-sturdy, and twisted the ends into place. Then twist the long 'stems' of your flowers around the loop, making sure not to leave too much space between blossoms. This was the best picture I could get of myself wearing my crown:

Hope you have fun making your own crown, or just turning out bunches of blooms!
So: here's what you need.
-at least 5 colors of tissue paper
-floral wire
-scissors
First, cut your tissue paper into small rectangles. Mine were about 2.5" by 3.5", but they don't have to be exact. Yours can be a little bigger or smaller, depending on how big you want your flowers to be. (These instructions also work for making GIANT flowers, which the kids enjoyed just as much. They don't make very good crowns, though.) Pick out 5 sheets, and cut a piece of floral wire about 4 inches long.

Next, stack your tissue paper sheets and accordion-fold them together the whole way across.

Fold the end of your floral wire (at least half an inch) over the middle of your tissue paper, and twist it tightly in place.

The next part can be a little tricky. Start pulling the individual 'petals' of your flower apart. Work from the center outwards.

Once you've separated all the petals, you should have a lovely, fluffy tissue-paper flower!

If you want to make your flowers into a crown, you'll need to make a bunch-- I used 7 for mine. Take a looooong piece of floral wire, and make a loop big enough to fit securely around your head. I wrapped mine around three times, so it would be extra-sturdy, and twisted the ends into place. Then twist the long 'stems' of your flowers around the loop, making sure not to leave too much space between blossoms. This was the best picture I could get of myself wearing my crown:

Hope you have fun making your own crown, or just turning out bunches of blooms!
Tuesday, May 10, 2011
just stopping by
Sticking my head in to say hello-- sorry there's been no outfits posts. I seem to have gotten too busy to take them on a regular basis, and blogging has fallen by the wayside.
However, if you'd like to see a lot of pretty pictures of 1950s dresses, I have taken to tumblr'ing them at http://a-red-robin.tumblr.com/. See you there!
However, if you'd like to see a lot of pretty pictures of 1950s dresses, I have taken to tumblr'ing them at http://a-red-robin.tumblr.com/. See you there!
Subscribe to:
Comments (Atom)


